© 1991 Brian R. Page
Blast Off With BASICChapter Seven: Getting GraphicExcept for the music we made in chapter four, the output of our programs has been words printed on the screen. BASIC can do better than this. It can also display GRAPHICS. BASIC provides several commands to create color displays and draw circles, lines, and boxes. To use these commands, your computer must have the right equipment. It must have a screen, or monitor, capable of displaying colors. Also, it must have the electronics capable of sending graphics to the screen. Not all personal computers have the hardware needed to display color graphics. Some have the electronics to display graphics but cannot do so in color. Others, especially the older machines, have neither the electronics nor the color display. If your machine is of this last kind, feel free to skip this chapter. If you have a color display monitor, you almost certainly can use all of the graphics covered in this chapter. TEXT MODE GRAPHICSOur ordinary screen output so far has consisted of letters, numbers, and the special characters on the keyboard. BASIC displays these in columns of eighty characters across the screen. This type of display is called TEXT MODE. Mode means a way of operating. Text mode is the simplest display mode. While in text mode, BASIC cannot display fancy graphics like circles. However, when a color display monitor is used in text mode, BASIC can add zest to your screens. BASIC can display the characters in any of sixteen colors with a background of eight possible colors. This is done with the COLOR statement. The COLOR statement sets the text, or foreground, color along with a background color. There are two forms of the COLOR statement. One is used in text mode. The other is used is graphics mode. Let's discuss text mode first. Here is the format of the COLOR statement in text mode:COLOR FOREGROUND,BACKGROUND Foreground is a number in the range 0 to 15. Each number matches a color listed below. Background is a number in the range of 0 to 7. The colors to chose from are: 0 Black 8 Gray 1 Blue 9 Bright Blue 2 Green 10 Bright Green 3 Cyan 11 Bright Cyan 4 Red 12 Bright Red 5 Magenta 13 Bright Magenta 6 Brown 14 Yellow 7 White 15 High-intensity White To experiment with the text and background colors in text mode, enter this program:
10  REM *************************************************************
20  REM *  TXTCOLOR                                                 *
30  REM *  Program displays background and text colors in text mode *
40  REM *************************************************************
50  PRINT "Display the background colors available in text mode."
60  PRINT "Enter a number in the range 0 to 7.   Enter 99 to go on."
70  INPUT BACKGROUND%
80  IF BACKGROUND% = 99 THEN GOTO 150
90  IF BACKGROUND% > 7 THEN GOTO 60
100 IF BACKGROUND% < 0 THEN GOTO 60
110 COLOR 15,BACKGROUND%
120 CLS
130 PRINT "The background color is" BACKGROUND%
140 GOTO 60
150 REM *****  DISPLAY FOREGROUND COLORS  *****
160 PRINT "Display the foreground colors available in text mode."
170 PRINT "Enter a number in the range 0 to 15.   Enter 99 to quit."
180 INPUT TEXT%
190 IF TEXT% = 99 THEN END
200 IF TEXT% > 15 THEN GOTO 170
210 IF TEXT% < 0 THEN GOTO 170
220 COLOR TEXT%
230 CLS
240 PRINT "The text color is" TEXT%
250 GOTO 170
This is a good program for planning how to use colors. Look closely at lines 110 and 120. In the first line, the COLOR command is issued. The foreground color of 15 has been used. This means the text will be high-intensity white. The background color is controlled by an integer variable called BACKGROUND%. Whatever number you enter in the range 0 through 7 will be placed into the BACKGROUND% variable. Once the COLOR statement has been executed, line 120 performs a clear screen to actually change the colors on the screen. Remember this. Whenever you use COLOR in text mode, you must use a CLS if you want the whole screen to change. Without the CLS, only the new letters appearing on the screen use the new colors. Try it. Experiment with the program and the COLOR statement. The TXTCOLOR program first allows you to try out the back- ground colors. When done, enter 99. The program then moves to line 150 and begins displaying the foreground, or text, colors. You have sixteen choices of colors for text. TXTCOLOR is a helpful program to use when selecting colors for a program. Play with the background colors until you find one you like. Remember its number. Then enter 99 and find a color for the text. Suppose you decide that the NIM program from the last chapter would look good with bright magenta letters against a blue background. You could add this BASIC statement to NIM2:
45 COLOR 13,1 Here is another way to make your programs better! You might even go back to the STORY program and add a different color to each page of your story. Before moving on, compare lines 110 and 220. On 110, both foreground and background colors are specified. Line 220, however, lists only a color for the text. If the background color is not included in the COLOR command, then it does not change. This makes it possible to PRINT several colors of text on a single display. Here is an example:
10  REM *********************************************************
20  REM *  PCOLOR                                               *
30  REM *  Demonstrates several colors on one screen.           *
40  REM *********************************************************
50  COLOR 10,1
60  CLS
70  PRINT "This line appears in bright green"
80  COLOR 11
90  PRINT "This line appears in bright cyan"
100 COLOR 12
110 PRINT "This line appears in bright red"
120 COLOR 13
130 PRINT "This line appears in bright magenta"
140 COLOR 14
150 PRINT "This line appears in yellow"
160 END
Try an experiment. Change the PCOLOR program to print one of the lines in blue, the same color as the background. What happens? MEDIUM RESOLUTION GRAPHICSText mode in color certainly looks nice, but it is still not real graphics. To create lines, circles, and boxes, we need to change from text mode into GRAPHICS MODE. Graphics mode requires that your personal computer be equipped with a Color Graphics Adapter (CGA). A CGA card inside your computer works with DOS and with BASIC to display medium resolution graphics. If you have a color monitor, you almost certainly have a CGA adapter. You might even have one of the fancier graphics adapters. In any case, a color monitor should be capable of handling all the examples in this chapter. If you do not have a color monitor, don't despair. You might still have the right graphics card to create the shapes. They will, of course, be of a single color. To switch your computer from text mode into graphics mode, issue the BASIC command SCREEN 1. In graphics mode, BASIC prints characters larger than in text mode. Instead of eighty characters across the width of the display, graphics mode prints only forty. The COLOR command, we noted above, has a different syntax when used in graphics mode. The command looks the same, but the numbers have different meanings. COLOR BACKGROUND,PALETTE In graphics mode, the background color comes first. Also, it may now be any of the sixteen colors. Then, instead of a single color for the foreground, the COLOR command specifies a palette of three colors. In the world of flesh and blood a palette is the board an artist uses to arrange colors while painting. We will cover palette colors later. To see how background colors work in graphics mode, enter this program:
10  REM *********************************************************
20  REM *  CGACOLOR                                             *
30  REM * Displays background colors available in graphics mode.
40  REM *********************************************************
50  SCREEN 1
60  PRINT "Enter a number in the range 0 to 15."
70  PRINT "Enter 99 to quit."
80  INPUT BACKGROUND%
90  IF BACKGROUND% = 99 THEN END
100 IF BACKGROUND% > 15 THEN GOTO 60
110 IF BACKGROUND% < 0 THEN GOTO 60
120 COLOR BACKGROUND%,1
130 CLS
140 PRINT "The background color is" BACKGROUND%
150 GOTO 60
Just like the TXTCOLOR program, CGACOLOR can be used to explore colors to use in your programs. Since SCREEN 1 graphics mode displays only forty characters across the monitor, you probably will not add medium resolution graphics to the programs you have already written. To switch from graphics mode back into text mode, enter these commands:
SCREEN 0
WIDTH 80
The SCREEN 0 command returns to text mode. However, the display is still only forty characters wide. The WIDTH 80 allows you to use all eighty spaces across the screen. You might find it easier to work on your programs in text mode. Now let's create some new programs especially for graphics. SCREEN COORDINATESIn order to draw a line, we must tell BASIC where to begin and end. For a circle, we must decide where to place the center and how large it will be. These tasks are done with coordinates. A coordinate is a set of numbers that exactly describe one tiny point on the screen. You are probably already familiar with several coordinate systems. For example, your town may be located by its latitude and longitude. Also, when you play BINGO, you position the pieces according to the coordinates called out by the leader. Finally, in mathematics, coordinates are used in X-Y graphs. BASICS's graphics coordinates are like these other kinds. In medium resolution graphics, the screen is 320 points wide and 200 points tall. The points are numbered from 0 to 319 across the screen from left to right, and 0 to 199 from the top down. Whenever coordinates are written, the horizontal, or side-to-side, number is listed first. The point in the top left of the screen is 0,0. The point in the top right is 319,0. In ordinary X-Y graphs, the X coordinate is the horizontal position. As you write graphics programs, it might help to use a piece of graph paper to plan the shapes. Mark the paper across the top with the X coordinates from 0 to 319. Then mark the
10 SCREEN 1
20 REM *****  across the top
30 LINE (0,0) - (319,0)
40 REM *****  down the left side
50 LINE (0,0) - (0,199)
60 REM *****  across the bottom
70 LINE (0,199) - (319,199)
80 REM *****  down the right side
90 LINE (319,0) - (319,199)
Now add these lines to write a big X across the screen:
110 REM *****  top left to bottom right
120 LINE (0,0) - (319,199)
130 REM *****  bottom left to top right
140 LINE (0,199) - (319,0)
To make a wide line, just draw several lines next to one another. For example, the following LINE statements draw a thick line across the middle of the screen.
10 SCREEN 1
20 LINE (0,100) - (319,100)
30 LINE (0,101) - (319,101)
40 LINE (0,102) - (319,102)
Since only the Y coordinate changes, this would be a perfect place to use a FOR-NEXT loop that goes from 100 TO 102. For very wide lines, a FOR-NEXT loop would be much better. Try writing one to draw a vertical line fifty points wide in the middle of the screen. Using screen coordinates with the LINE command can be confusing. Remember that each set of numbers inside the parentheses identify only one point on the screen. BASIC takes care of drawing the line between the two points. You may list either end of the line first. For example, these two statements draw the same line:
20 LINE (0,100) - (319,100)
30 LINE (319,100) - (0,100)
To completely understand screen coordinates, take time to experiment with the LINE statement. Mark your coordinates on a piece of graph paper and compare the paper with the display. Be sure to include a SCREEN 1 statement before trying to draw a line. If you forget, BASIC issues an ILLEGAL FUNCTION CALL error message. Coordinates are also used to create circles. To use the BASIC CIRCLE statement, place the X-Y coordinates in paren- theses and then list the size of the circle. The size is specified in points from the center to the edge. This is called the radius. For example, the following command draws a circle in the center of the screen. It has a radius of fifty points.
CIRCLE (160,100),50 To make a wider circle, use a FOR-NEXT and replace the radius with an integer variable. Indeed, you could completely fill the circle by writing FOR X% = 0 TO 50. GRAPHICS MODE COLORSNow that we have mastered screen coordinates, let's add color. Both the LINE and the CIRCLE commands work together with the graphics mode COLOR command. You will remember that COLOR included a palette number in addition to the background number. Here is the COLOR command again: COLOR BACKGROUND,PALETTE The palette can be either 0 or 1. Each palette contains three colors.
      COLOR   PALETTE 0   PALETTE 1

      1       Green       Cyan
      2       Red         Magenta
      3       Brown       White
The LINE and CIRCLE statements can include a color number. For example, a LINE command may specify a color of 2. BASIC draws the line on the screen in either red or magenta depending on the COLOR statement. Try this:
10 SCREEN 1
20 COLOR 1,0
30 LINE (0,100) - (319,100),2
The 2 at the end of the LINE command selects one of the three colors from the palette. In this case, since the COLOR statement selected palette 0, the line is drawn in red. Now change the palette in the COLOR statement on line 20. Change it from palette 0 to palette 1. Run the program again, and the line is drawn in magenta. You have changed the color of the line without changing anything on the LINE statement. This is how LINE and COLOR work together. To get a LINE or CIRCLE in a certain color, you must first prepare the correct COLOR command. The CIRCLE command works just like the LINE statement. The COLOR number is added af- ter the radius. Enter this next program to see how colors are selected.
10 SCREEN 1
20 COLOR 10,1
30 LINE (50,50) - (270,50),2
40 CIRCLE (160,80),30,1
In medium resolution graphics mode, the COLOR command takes effect immediately after it is used. Thus, you cannot change the palette between displays on a single screen. If we inserted a line 35 with a COLOR 10,0 statement, the color of the line drawn by line 30 would change! Even though the line has already been drawn on the screen, it would change color. A palette provides a choice of only three colors to use on any one display. Keep this in mind as you plan your pictures. You may only use the three colors from one palette at a time. You may, of course, switch palettes between screen displays. Just for fun, let's enter a program that uses all three colors from a palette. Also, the program will use three FOR- NEXT loops to draw wide circles. We'll call this program TARGET.
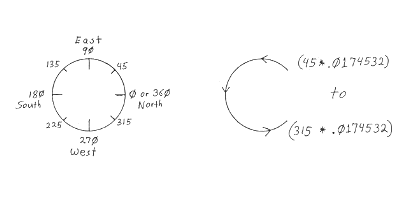
10  REM *******************************************************
20  REM * TARGET                                              *
30  REM * This program draws a colorful target.               *
40  REM *******************************************************
50  SCREEN 1
60  COLOR 1,1
70  FOR X% = 10 TO 20
80     CIRCLE (160,100),X%,1
90   NEXT X%
100  FOR X% = 30 TO 40
110    CIRCLE (160,100),X%,2
120  NEXT X%
130  FOR X% = 50 TO 60
140    CIRCLE (160,100),X%,3
150 NEXT X%
160 END
Each of the three circles has the same center. The radius is set by the integer variable X%. This variable is used in the loop and increases by one each time through the loop. Each loop executes a CIRCLE statement eleven times. This is how we make wide bands instead of skinny circles. Since you know the center of the circle is at coordinates (160,100), try using a LINE statement to put an arrow into the bull's eye. You will get extra points for creating an arrow head and feathers! CIRCLE STATEMENTBoth the LINE and the CIRCLE commands have been used to help understand screen coordinates and color palettes. Now we must look at these statements more closely. First, let's tackle CIRCLE: CIRCLE (X,Y),RADIUS,COLOR, START,END In our earlier examples of CIRCLE, we did not use all of the options. These other options, start and end allow us to draw partial circles. This is pretty complicated. The numbers which describe the starting and ending points of a circle are not coordinates. They are angles in radians. One radian is a section of the circle (an arc) that is equal in length to the radius. Radians are used frequently in advanced mathematics. Fortunately, we can avoid radians and create circles using degrees, like a compass. Here is how. A complete circle is 6.28318 radians. When we use a compass, a complete circle is 360 degrees. Thus, we can see that one degree equals .0174532 radians. All we need to do is multiply a number in degrees by .0174532. We can even let BASIC do the arithmetic! CIRCLE offers one other complication. Circles begin at the right and go counterclockwise. In other words, the 0 position is at the far right edge. If our circle were a compass, 0 degrees North would be on the right. See Figure 9 on page 88. The top of the circle is 90 degrees. In radians this is 90 multiplied .0174532. When BASIC draws a partial circle, it begins at the start number and moves counterclockwise until it reaches the end number. IT ALWAYS DRAWS COUNTERCLOCKWISE. Unlike the LINE command, you cannot switch the starting and ending points and still create the same picture. Some examples will make this clear.
10  REM *********************************************************
20  REM *  CIRCLES                                              *
30  REM *  Demonstrates several kinds of partial circles        *
40  REM *********************************************************
50  SCREEN 1
60  COLOR 1,1
70  RPD! = .0174532
80  CIRCLE (50,30),20,3,(90 * RPD!),(180 * RPD!)
90  CIRCLE (100,30),20,3,(180 * RPD!),(90 * RPD!)
100 CIRCLE (150,30),20,3,(0 * RPD!),(35 * RPD!)
110 CIRCLE (200,30),20,3,(360 * RPD!),(35 * RPD!)
120 CIRCLE (250,30),20,3,(20 * RPD!),(200 * RPD!)
130 CIRCLE (100,110),50,3,(45 * RPD!),(135 * RPD!)
140 CIRCLE (200,110),50,3,(100 * RPD!),(80 * RPD!)
150 END
First look at line 70. The RPD! single precision variable holds the number of Radians Per Degree. That is how many radians fit in one degree. Next, compare each CIRCLE statement with the syntax explanation. Be sure you understand each option. Know which numbers define the radius, the color, and the start and end positions. Now look at line 80, the first CIRCLE command. This circle begins at the 90 degree position of the circle. Since the CIRCLE statement needs the position in radians rather than degrees, we let BASIC multiply 90 by the RPD! variable. This keeps things simple for us. The circle begins at 90 degrees and continues to 180 degrees. In the next CIRCLE statement, on line 90, the start and end positions are switched. This circle begins at 180 degrees and moves counterclockwise to the 90 degree position. All circles are drawn counterclockwise. The next two circles are the same. Check lines 100 and 110. In the first, the right edge of the circle is position 0. On line 110, this same position is 360 degrees. This is just like a compass. Compass north is both 0 and 360 degrees! The CIRCLE command has one final trick for us. We can turn circles into pies by making the start or end numbers negative. When a negative number is used, BASIC draws a line from the center of the circle to the edge. To get pies, we need to place a minus sign in front of each number listing degrees. We have one exception. BASIC will not allow 0 to be negative. Thus, line 100 cannot have a line drawn to the right. To get a line drawn to the beginning point of a circle, use a negative 360. The following examples use the same circles as before:
10  REM *********************************************************
20  REM *  PIES                                                 *
30  REM *  Demonstrates several kinds of partial pies.          *
40  REM *********************************************************
50  SCREEN 1
60  COLOR 1,1
70  RPD! = .0174532
80  CIRCLE (50,30),20,3,(-90 * RPD!),(-180 * RPD!)
90  CIRCLE (100,30),20,3,(-180 * RPD!),(-90 * RPD!)
100 CIRCLE (150,30),20,3,(0 * RPD!),(-35 * RPD!)
110 CIRCLE (200,30),20,3,(-360 * RPD!),(-35 * RPD!)
120 CIRCLE (250,30),20,3,(-20 * RPD!),(-200 * RPD!)
130 CIRCLE (100,110),50,3,(-45 * RPD!),(-135 * RPD!)
140 CIRCLE (200,110),50,3,(-100 * RPD!),(-80 * RPD!)
150 END
Line 100 makes a strange piece of pie. Only one edge of its circle has a line drawn to the center! BASIC will not allow a negative 0. A final CIRCLE program uses both complete circles and a partial circle.
10 REM ********************************************************
20 REM * HAPPY                                                *
30 REM * This program draws a happy face.                     *
40 REM ********************************************************
50 SCREEN 1
60 COLOR 5,1
70 CLS
80 RPD! = .0174532        'RADIANS PER DEGREE
90 CIRCLE (160,100),70,3
100 CIRCLE (135,80),10,1
110 CIRCLE (185,80),10,1
120 CIRCLE (160,110),30,1,(180*RPD!),(360*RPD!)
130 END
As you can see, working with circles takes a lot of planning and careful typing. If you have trouble, try working out the diagrams on graph paper first. Remember that circles are drawn counterclockwise. Use Figure 9 on page 88 to find the points on the edge of the circle where you want to start and end. Review all of the examples. Think like a computer and draw some of the CIRCLE commands on graph paper. Make sure all the commas are in the right places. Above all, experiment! Build your programs slowly. Run a program each time you create a CIRCLE statement. Then you can catch a mistake as soon as it happens. Don't write a dozen circle statements and then try to find the one that is not working as you had planned. LINE STATEMENTLike CIRCLE, the LINE command still has a few secrets we need to explore. Here is the full syntax of LINE: LINE (X,Y) - (X,Y),COLOR,BF The coordinates and the color number should be familiar. We have added something after the color. The B and the F stand for Box and Fill. These options allow us to create a box without drawing all four sides and to fill the box with the color. To create a box, the X and Y coordinates identify two opposite corners of a box. For instance, when we introduced the line command we created a box around the edge of the screen. To do this we used four LINE statements. With the Box option, this can be done in one command:
10 SCREEN 1
20 COLOR 1,0
30 LINE (0,0) - (319,199),2,B
Notice that our coordinates are the top left and the bottom right of the screen. Trying leaving off the B option. Be sure to remove the comma in front of the B, also. Next, put the B back and add an F after the B. Do not add a comma between the B and the F. By using variables and FOR-NEXT loops, we can create triangles with the LINE statement. To do this, replace one of the coordinates with an integer variable. The triangle will be drawn one line at a time with each pass through the loop. Enter this example:
10 SCREEN 1
20 COLOR 1,1
30 FOR X% = 100 TO 220
40  LINE (160,50) - (X%,150),3
50 NEXT X%
The top of the pyramid is located at coordinates 160,50. The bottom of the pyramid is located on line 150 on the Y axis and runs from point 100 to 200 on the X axis. To gain experience using FOR-NEXT loops to draw triangles, add a second triangle of a different color inside the pyra- mid. CALLING ALL ROCKET SCIENTISTSLet's put together what we have learned about lines and boxes and create a picture. We will also learn new BASIC statements. The next program draws a rocket on the screen. It uses a box for the body of the rocket and triangles for the nose and the fins.
10  REM *********************************************************
20  REM *  ROCKET1                                              *
30  REM *  Draw a rocket using BASIC graphics.                  *
40  REM *********************************************************
50  KEY OFF
60  CLS
70  SCREEN 1
80  COLOR 10,0
90  REM *****  DRAW THE ROCKET  *****
100  LINE (200,100) - (220,190),2,BF
110 FOR NOSE% = 200 TO 220
120   LINE (210,80) - (NOSE%,100),2
130 NEXT NOSE%
140 FOR FIN1% = 180 TO 190
150   LINE (195,190) - (200,FIN1%),2
160 NEXT FIN1%
170 FOR FIN2% = 180 TO 190
180   LINE (225,190) - (220,FIN2%),2
190 NEXT FIN2%
200 END
Before looking at the LINE statements, examine line 50. BASIC places labels at the bottom of the screen describing the use of the function keys. The KEY OFF statement causes these labels to disappear. You may, of course, continue to use the function keys to LOAD, LIST, and SAVE your programs. However, the labels will not be visible on the screen. The KEY ON statement makes the labels reappear. For graphics displays that are supposed to look nice, using KEY OFF is a good idea. The rest of the program is simple. Line 100 draws the body of the rocket using the box and fill options. The FOR-NEXT loop between lines 110 and 130 draws the pointed nose of the rocket. Then, two FOR-NEXT loops at lines 140 to 160, and 170 to 180, add triangles on each side of the base of the rocket. Now let's add a few lines to launch the rocket:
20  REM *  ROCKET2                                              *
30  REM *  Launch a rocket.                                     *
350 REM ***** LAUNCH THE ROCKET  *****
360 FOR X% = 1 TO 50
370   PRINT
380 NEXT X%
390 END
Make sure you DELETE line number 200. We do not want to END the program before it gets to the new lines. This addi- tional code is numbered beginning with 350 because we are going to add some more lines later. No new BASIC commands are introduced in this routine; in- deed, this routing does not do much. It is simply a FOR- NEXT loop that issues a PRINT command. Note, however, that nothing is printed. What happens when we run this program. The rocket is launched! Here is why. Each time BASIC executes the PRINT command, it moves the cursor down one line. When the cursor reaches the bottom of the screen, everything on the screen moves up. This is called SCROLLING. Printing at the bottom of the screen causes the picture to scroll off the top of the display. As a result, the rocket appears to blast off! The first twenty-four times through the loop simply move the cursor from the top left position of the screen down to the bottom. Then the remaining PRINT statements cause the rocket to move up the screen. Perhaps we could make this program a bit fancier. When rockets blast off, we always have a count down. Let's add a count down and a title.
20  REM *  ROCKET3                                              *
30  REM *  Countdown and launch a rocket.                       *
85  TMINUS% = 10
200 REM *****  PRINT THE TITLE  *****
210 LOCATE 5,10
220 PRINT "Blast Off With BASIC"
230 REM *****  DO THE COUNT DOWN  *****
240 FOR TMINUS% = 10 TO 0 STEP -1
250   LOCATE 10,10
260   PRINT TMINUS%
270   FOR SEC% = 1 TO 9000
280   NEXT SEC%
290 NEXT TMINUS%
300 REM *****  GET RID OF THE WORDS  *****
310 LOCATE 10,10
320 PRINT "  "
330 LOCATE 5,10
340 PRINT "                    "
Line 85 adds an integer variable called TMINUS% and sets it equal to ten. This will be used for the count down. Line 210 introduces a new BASIC statement. LOCATE positions the cursor at a certain place on the screen. LOCATE tells BASIC where to display output. Any PRINT statement following a LOCATE will place its output at the new position. LOCATE ROW,COLUMN Row is a number in the range 1 to 25. This is the number of lines on the screen. They are numbered down from the top. The LOCATE statement on line 210 places the cursor five lines down from the top of the display. The column is a number in the range 1 to 40. This is the number of charac- ter positions across the width of the screen. They are num- bered from the left. Do not confuse the row and column numbers with the points used in the coordinates of CIRCLE and LINE. When the PRINT command on line 220 is executed, the words Blast Off With BASIC are written five lines from the top and ten spaces from the left. When LOCATE is used in text mode, the columns may range from 1 to 80; however, in graphics mode, only forty spaces are displayed. After printing the title, the routine beginning on line 230 does the count down. A FOR-NEXT loop with a STEP of -1 causes the TMINUS% variable to go from 10 to 0. Inside the loop, several commands are executed. First, another LOCATE command places the cursor ten lines from the top of the screen, and ten spaces from the edge. Then, a PRINT statement ment displays TMINUS%. What happens next is interesting. A FOR-NEXT loop is nested within the first loop. This second loop does nothing but count from 1 to 9000. Why? In a real count down, the numbers should stay on the screen for one second. Without the second FOR-NEXT loop, the numbers bers would change so quickly that you would not be able to read them. Lines 270 and 280 keep the computer busy for about one second. You may have to use another value than 9000. On a slow Personal Computer, the loop may only need to count from 1 to 3000. Experiment with different values until you find one that is right for your machine. The next routine, beginning at line 300 blanks out the title and the count down. If we did not do this, the words and the count down would blast off along with the rocket! This routine simply uses LOCATE to position the cursor to print spaces over the text. Finally, we get to the routine we entered earlier, line 350. The rocket blasts off! Wouldn't it be nice if we could hear the blast off? Maybe we have a SOUND routine that would fit into this program?
|